To avoid burns, do not replace the fuser immediately after printing, as the fuser gets very hot during this process.
CAUTION: To prevent electric shock, always turn off the printer and disconnect the power cable from the grounded outlet before cleaning the printer or performing maintenance.
CAUTION: Before performing any of the following procedures, read and follow the safety instructions in your Owner's Manual.
Removing the Used Fuser
Remove any print jobs from the center output tray, and close the multipurpose feeder cover before opening the outer front cover.
Removing the Used Fuser
Remove any print jobs from the center output tray, and close the multipurpose feeder cover before opening the outer front cover.
1. Turn off the printer and wait for 30 minutes.
2. Push the side button and open the outer front cover

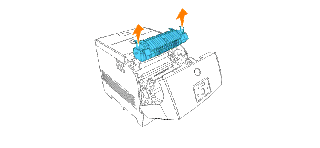
3. Lift up the levers next to both ends of the fuser.

4. Grip the knobs and gently lift the fuser out of the printer
Installing the New Fuser
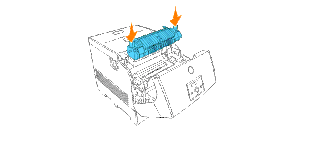
1. Unpack a new fuser, grip the fuser by the knobs, align it with the slots in the printer, and slowly push it in.
2. Completely push down the fuser by holding the knobs at both ends of the fuser until the levers next to both ends of the fuser return to their original position.

3. Close the outer front cover.