Showing posts with label printer problems. Show all posts

Monday, August 30, 2010

Improving Faint Print or Blank Pages on the Dell 1320c Color Laser Printer

The Print Head Device (PHD) in the Dell 1320c Color Laser Printer is packaged with eight plastic ribbon-type tapes. Four of these are long tapes covering the actual print drum rollers. The other four are much shorter and cover the toner inlets at the back of each roller. If a tape breaks off and is not fully removed before installing the PHD, it prevents toner from reaching the roller, which can lead to faint printing or blank pages with no printing.
Verify the Packing Materials Have Been Removed From the Print Head Device (PHD)
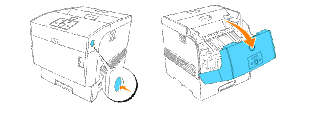
1. Press the button in the upper right side of the printer and open the front cover. Open the Front Cover of the Printer
2. Turn the four PHD lock levers counterclockwise to unlock the unit. Rotate the Lock Levers to Unlock the PHD Unit

3. Remove the PHD unit from the printer.

4. Completely remove the eight yellow ribbons from the PHD unit by pulling them straight out perpendicular from the PHD unit.
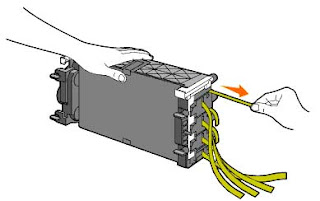

There are 8 protective tapes, 4 long ones with 4 shorter ones behind them. These must be pulled straight outward from the unit to prevent print quality issues. Make sure no fragments of these tapes remain in the PHD.
5. Insert the PHD unit until it is seated properly, and turn the four PHD lock levers clockwise to lock the PHD unit
6. Carefully remove the front protective sheet from the PHD unit
7. Close the front cover.

Wednesday, July 14, 2010

Replacing the Fuser

To avoid burns, do not replace the fuser immediately after printing, as the fuser gets very hot during this process.
CAUTION: To prevent electric shock, always turn off the printer and disconnect the power cable from the grounded outlet before cleaning the printer or performing maintenance.
CAUTION: Before performing any of the following procedures, read and follow the safety instructions in your Owner's Manual.
Removing the Used Fuser
Remove any print jobs from the center output tray, and close the multipurpose feeder cover before opening the outer front cover.


1. Turn off the printer and wait for 30 minutes.
2. Push the side button and open the outer front cover
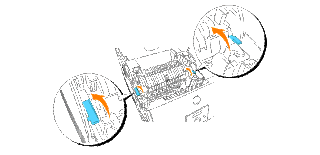
3. Lift up the levers next to both ends of the fuser.


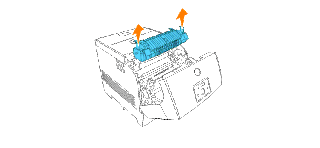
4. Grip the knobs and gently lift the fuser out of the printer


Installing the New Fuser


1. Unpack a new fuser, grip the fuser by the knobs, align it with the slots in the printer, and slowly push it in.


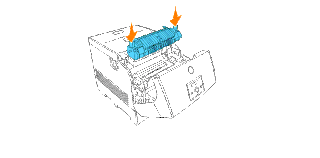
2. Completely push down the fuser by holding the knobs at both ends of the fuser until the levers next to both ends of the fuser return to their original position.


3. Close the outer front cover.